News
Façade paint on difficult substrates – case study
The most comprehensive test for construction chemicals in view of their efficiency and durability consists in applying them onto difficult substrates. In particular, it refers to products which yet have not been tested on sites by the professionals. Thus, we decided to test on site (while renovating a single-family house) ATLAS Salta E – our new acrylic façade paint. The challenging part was, among others, an existing façade render of rustic texture and thickness of 3 mm.
The rustic texture render on 10- or 20-year-old façades is considered as a difficult substrate. The texture is irregular – it is formed of smooth surface with deep pitting, which is not easy to coat with paint precisely. When the façade is polluted, dirty (as it happened in our case), the work becomes even more complicated. As the dirt settles irregularly – it is mostly present in pitting – it is more difficult to remove than in case of a spotted render texture.
Such conditions are quite extreme and they are challenging not only for the professionals, but also for the product. How is it going to perform? Will it stand up to difficult conditions? Is the information included in the technical data sheet in correlation with the actual work on site? In our case, this new product performed excellent under difficult conditions – we describe it below. But first things first…
WORK PREPARATION
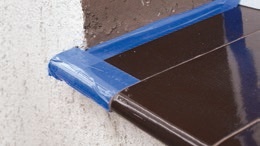
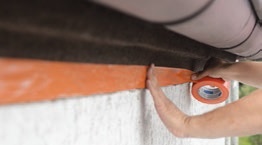
The ground rules for a successful restoration are: proper substrate assessment, preparation for application of the new coating, but also protection of the environment against contamination. Therefore, such elements as windows, doors, frames, window sills and other details which could not be dismantled before the house painting (Photo 1, 2), were covered with foil and tapes of adequate quality. While securing, e.g. a window blind (closed), we protected the edges which were in direct contact with render first, and only then we covered the element with a self-adhesive foil of “stretch” type (it is definitely thicker and more durable than a “standard” foil). This was done so that the junction between the render and different surfaces can be accurately repainted, with no staining.
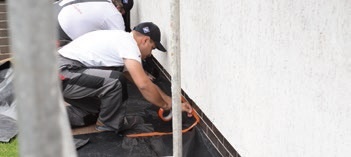
We covered also the area adjacent to the house (of the width of the scaffolding) – the peripheral pavement (Photo 3). Why is it so important to spread the foil also on the ground? Sometimes happens that paint may drip a little from a brush or a roller set aside. Therefore, one may accidentally mark the pavement with paint which stuck to one’s shoe. Naturally, the foil was attached to the sett or pavement tiles with a special tape.
SURFACE PREPARATION
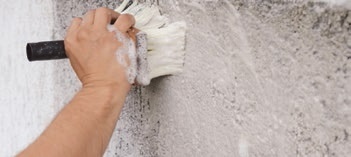
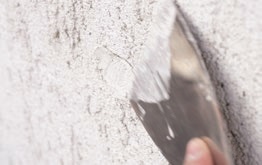
Having secured the area of work we prepare the surface for painting. What is particularly important is to remove the old coatings, loose parts and any dirt, such as grease or algae. How can we do this? It is done mechanically, using a steel brush or a spatula (Photo 4), or using a high pressure washer. The last option is doubly effective as a powerful jet cleaner removes not only loose parts but also cleans dirt away. When renovating a façade which is biologically contaminated, we need to clean the tarnish and superficial dirt, and then apply ATLAS MYKOS – a fungicide preparation recommended for removing tarnish of organic origin, such as fungi, moulds, lichens, algae and mosses.
CAVITIES
The next stage is filling the cavities. In case of rustic render of 3 mm aggregate thickness, it was not simple because of its porous structure. The shallow, superficial cavities (their depth is up to the render thickness) were firstly primed with ATLAS Cerplast priming mass and then filled with render, which was originally used on the façade. If we happen to have a deeper cavity, our advice is to inject low pressure foam first, and next apply the render to form a texture which does not differ visually from the rest of the surface.
Unfortunately, it is difficult to form/repeat the original render texture. We used the technique in which we applied the render onto the wall and distributed it with long horizontal, vertical or circular moves. This way, we could form characteristic pitting – an effect the rustic renders are known for. In case of cavities which occurred on a smooth surface, the filling was relatively easy. On the other hand, if the cavity is located directly in a pitting then we need to re-shape its design, which, to be honest, requires some artistic skills (Photo 5).
The key issue is to choose the render of the appropriate aggregate thickness, so that there are no unaesthetic spots on the surface which could be visible even after painting.
CRACKS
When checking the façade surface and preparing the substrate for painting, we came across some larger cracks which resulted from possible impact or tension. In such case, it is important to verify whether the process of cracking has already stopped. If so, the place should be filled with special fillers containing façade aggregate – they provide granular texture confluent with the original render. We apply them by squeezing the preparation straight from the tube into the cracks with the use of a gun. Next, we rub the filler into a crack using a finger or slightly damp brush, so as to keep the continuity of the texture. If the thermal insulation layer (polystyrene) is damaged, we fill the cavities with low pressure expanding foam (as we are not able to fill it with polystyrene).
PRIMING
We need to apply a primer just before painting. It’s selected depending on the level of contamination and type of surface. Our façade was dirty and greasy, therefore we used a special separating primer. The surface can also be primed with the paint slightly diluted with water to obtain even substrate absorption and avoid discoloration. This is a recommended method when applying paint onto renders of various thicknesses – the paint will dry longer at the area where the render is thicker and it will dry faster at the area where the render is thinner. In the given case, we applied the first coating in the form of a slightly diluted paint (according to the manufacturer’s instructions).
PAINTING
Before we present the method of painting, we would like to explain briefly why we decided to use ATLAS SALTA E acrylic paint on this particular façade:
1. Acrylic paint is an economical solution – price is a priority requirement for some investors.
2. It is one of the newest products in ATLAS offer – we wanted to verify how it performs in practice.
Let’s get back to the painting. We recommend painting twice when renovating old façades of porous texture (such as the one we describe), which have lost its original color. This enables to obtain full coating over the entire building surface, and appropriate thickness of the protective layer. Technological breaks should be planned in view of the structure and size of the building, e.g.: at the line determined by window reveals in case of large surfaces. On the other hand, one can paint from one corner to the other without breaks in case of small surfaces. Another thing is that one needs to hire a team consisting of appropriate number of workmen – it is difficult to handle such large area as described here, by oneself without putting it at risk of discoloration. The façade can be painted differently, depending on the tool actually in use, which is described in details below.
After the painting we need to clean up the work place – this means dismantling protective meshes, scaffolding, removing the tapes and foils, washing the tools.
WHY TO USE SALTA E?
The paint has very good operating parameters:
- the consistency is matched optimally to enable easy painting; there is no need to add water – you simply open it, mix and apply.
- splashing is minor; the paint adheres well to the roller so the application is problem-free.
Besides, it has excellent coating properties. It was easy to see already after the application of the first coat.
After painting, the façade looks as new. The work was performed in the early spring in almost extreme temperature – up to 10°C (recommended is 5-25°C). We painted the surface once or twice with a new paint. Now the façade is properly protected and certainly may retain this state for many years. The cost of paint is the outcome of good quality and reasonable price so it is attractive for most of our customers. All in all, it performed excellent.
THREE METHODS OF PAINTING THE FAÇADE
We had the opportunity to test three methods of painting – below we describe their advantages and disadvantages:
METHOD 1: PAINTING WITH A ROLLER OF THICK AND LONG BRISTLE (owing to them the paint fills any pits in a porous texture).
Advantages:
– the most economical method (roller is cheap, widely available).
Disadvantages:
– labor-intensive and time-consuming option (working time depends also on the possibility of deployment of scaffolding and use of telescopic rollers),
– it requires frequent soaking the roller with paint (especially in case of faded substrate, difficult surface like 3 mm rustic render),
– areas which are hardly accessible or too narrow to use a roller (unless we have a roller for corners),
– possibility of local excess of paint on the texture, which results in different light reflection, or shadows on the façade.
METHOD 2: PAINTING WITH A SPRAY GUN
Advantages:
– narrow spray pattern fills accurately the gaps and pits in the texture,
– ease to use when painting ceilings or hardly accessible areas (when the tap applicator is bent correctly the paint can be applied on areas where other tools cannot be used).
Disadvantages:
– the cost of a spray gun (it depends on the manufacturer), we used Graco WP Easy Max II (it costs approx. 600 euros),
– immediately after the paint is applied to the surface one still needs to spread the paint with a dry roller,
– little dusting (in the form of a mist) around the applicator,
– different spraying angles resulting from the need to circumvent the scaffolding – they can cause the impression of discoloration.
METHOD 3: JETROLLER – COMBINATION OF A ROLLER SPRAY, EXTENSION FOR PAINTING AND ROLLER FOR A MANUAL APPLICATION IN ONE SET (in other words: combination of solutions no. 1 and no. 2)
Advantages:
– ease to use,
– very accurate application (the applicator for paint may be placed before or after the roller, depending on needs – the width of the stream is adjusted to the width of the tool: 18 or 25 cm),
– quick work pace (simultaneous spraying and spreading of the paint),
– no need for frequent soaking the roller in a bucket with paint,
– very little dusting,
– efficient also when performing difficult works (coats easily hardly accessible areas),
– coats the surface evenly.
Disadvantages:
– high cost of purchase or rental – depending on the manufacturer (we used Graco JetRoller).
|
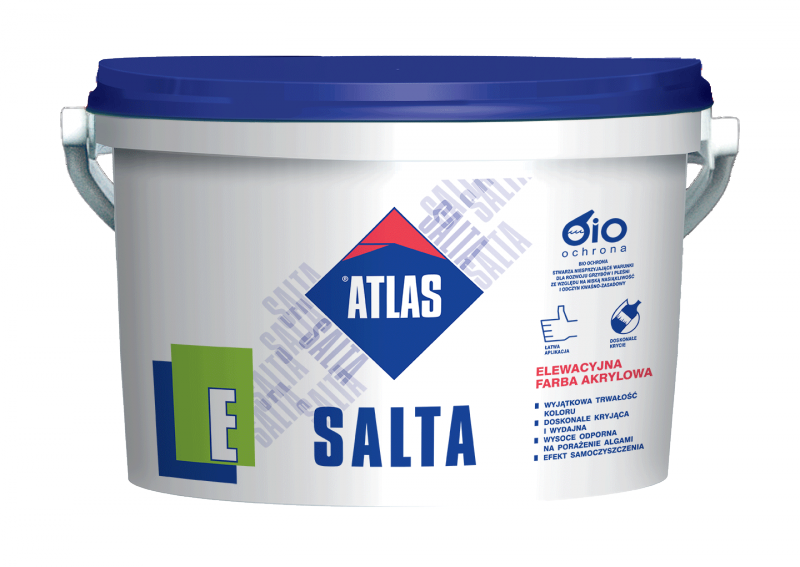
ATLAS SALTA E – acrylic façade paint Recommended for surfaces exposed to high thermal load – due to elasticity and high resistance to cracks and scratches, it compensates strain resulting from different heat expansion of layers beneath, e.g. present in sunlit façades. Nonabsorptive – protects the painted substrate against humidity permeating from the surroundings. It performs well at areas exposed to this kind of risk, on façades and walls of: schools, shops, sport facilities, buildings in the areas of traffic routes, staircases, corridors, etc. Resistant to unfavorable atmospheric conditions and all kinds of aggressive factors contained both in the substrate and the surroundings. Self-cleaning ability due tothe content of high quality resin and hydrophobic agents. Economical solution – for clients who place the price among their decisive factors when choosing the façade paint. Packaging: 10 l. |
Original text: Mirosław Kwiatkowski, ATLAS instructor
English text: Piotr Marciniak, Michał Gosławski, ATLAS Group