News
Installation of large size slim tiles
Installation of large size slim ceramic tiles is considered to be a very challenging task by most of the tilers. The first contact with this type of tiles brings up many doubts: how to move, cut or bond such a big tile, how to cut the holes etc. To top it all off, large size slim tiles are expensive and this fact petrifies tilers, who are afraid to damage them accidentally. Nevertheless, the installation of large size tiles is not as black as it is painted. One just needs to stick to certain rules. What rules? If you read this article you will get to know them.
Large size slim tiles are manufactured from quartz sinter or, the most commonly, from porcelain-gres, which is made as the result of pressing the mixture of clay and milled rock and further burning in very high temperature. Owing to the specific manufacturing process it is possible to obtain tiles of thickness from 3 up to 9 mm and sides length 50 x 100 cm, 100 x 100 cm and even 100 x 300 cm which gives a stunning 3 square metres per tile! The thinner tiles (from 3 up to 6 mm) are intended for walls, whereas the thicker ones can be used both on walls and floors. Usually manufacturers place the information regarding the intended use on the packaging. The bottom part of the tile is most often covered with fibreglass mesh which greatly improves its technical parameters. The weight of such tile is only 7 to 8 kg. Small weight makes it easier to operate, move and cut the tile.
Five recommendations for work with large size slim tiles
- Room
The room where the tiles are to be fixed must meet several conditions. Most of all, it cannot be too small. For example, one would not be able to access a small toilet of 100 x 80 cm surface area (quite popular especially in blocks of flats) carrying a huge 100 x 300 cm tile, not to mention handling this tile during installation. A small door opening and very little space inside would definitely make it impossible to maneuver. There is one clever method to check whether the assembly in a small compartment is possible in the first place. One simply needs to cut the plasterboard to the given size and move it into the room without damaging.
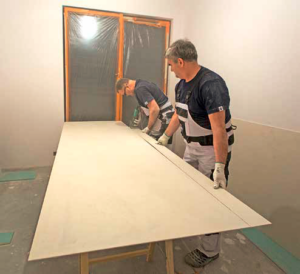
It often happens that the room where the tiles will be fixed is too small for the preparation and cutting. In such situations it is necessary to adapt another compartment which is big enough to put a table on which a tile will be prepared for fixing. If there is no such space, the preparation must be carried out outdoors. It is beyond any doubt that installation of slim tiles (especially 100 x 300 cm size) requires teamwork (Photo 1). One person is definitely not able to carry out such fixing (despite of holding any necessary tools); it relates especially to moving and bonding the tiles.
- Tools
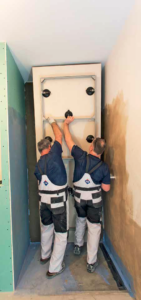
To be honest, they are rather expensive. However, they significantly improve the comfort and safety of work. It is no way dishonourable for a tiler to rent tools from specialist rental companies. Such companies are present in every major city. The particularly handy tools are: a frame with suction cups and a set for transporting large size tiles (Photo 2 & 4). They stiffen, help to move, maneuver and place a tile in a correct position during bonding.
Large size slim tiles can be cut with the use of manual cutter along with a guide and suction cups or clamps (Photo 3). This type of a cutter provides dust-free and quick cutting of tiles. Another option is any type of an electric disc cutter or a traditional angle grinder with appropriate diamond disc.
If one needs to smooth an edge of a tile then all sorts of abrasive discs mounted to the angle grinders with adjustable speed offer excellent solution for. Any holes should be drilled with a diamond hole saw, preferably water fed to minimize excessive overheating of the tile during drilling. Overheating could result in uncontrollable cracking.
For such large size it is not recommended to lay the tiles cut to so-called “L-shape” as they are particularly vulnerable to microcracking during any structural stress.
- Substrate
The substrate must be non-deformable, geometrically stable (no curvature) and perfectly even. Different adhesive layer thickness beneath the tile may result in uneven contraction during the process of setting. This in turn gives an uneven tiled plane and high risk of potential microcracks on the surface. This is why the substrate should be levelled first. We recommend using ATLAS ZW 330 or ATLAS ZW 50 mortars for walls leveling and ATLAS SMS 15 or ATLAS SMS 30 for leveling the floors. The substrate moisture content should not exceed 2% for cement mortars and 0.5% for anhydrite mortars. A great advantage of large slim tiles is their small thickness – just about 3 to 5 mm. Owing to this feature, this type of tiles can be applied onto old (well bonded) tiles without the loss of space in the room or much additional load.
|
|
WE RECOMMEND SMS 30 self-leveling screed
|
4. Adhesive
When working with large slim tiles one should use deformable adhesives of at least C2 S1 class, no matter whether they are fast-setting (e.g. ATLAS Plus Express) or normal-setting (the rest of adhesives of C2 S1 class offered by Atlas). We recommend using ATLAS Ultra Geoflex, ATLAS Plus (Aval KM 17) and ATLAS Plus White on vertical substrates and ATLAS Plus Mega or ATLAS Plus Mega Whiteon horizontal surfaces (where 100% filling beneath a tile is of great importance).
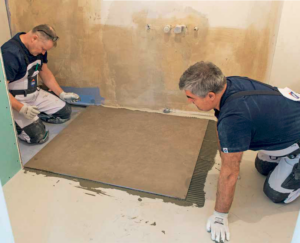
One must remember that some tiles are vulnerable to excessive initial moisture content in the adhesive – it may cause deformation of the tile. Therefore, one must follow tiles manufacturer’s recommendations. Another way to deal with it is to do a trial bonding before the actual bonding. When fixing large slim tiles, one must remember that they require the combined bonding method (Photo 5): firstly the adhesive must be applied firmly on the tile and spread with a 4 mm notched trowel and then the adhesive must be distributed over the substrate with a 6 mm notched trowel. Because of large surface to be covered, the time of application of an adhesive is long and therefore one must use the adhesives with extended open time (all of the aforementioned Atlas adhesives have this feature).
|
|
WE RECOMMEND ATLAS Plus Mega White
|

5. Grout
Despite of the wishes of the interior designers, who often design large uniform planes without any joints, one cannot fix large slim tiles without joints in between. What is more, the width of the joint should be greater than 5 mm. Grouting should be done with high quality grout capable of compensating the potential stress, e.g. ATLAS Artis or ATLAS Epoxy Grout. What is particularly important, the grouting of large tiles must be carried out much later comparing to tiles of area below 0.25 m2. It results from the fact that more time is needed for moisture to evaporate from beneath a large tile. Grouting time depends on atmospheric conditions at site. Usually in standard conditions (temp. 21°C and humidity 55%) the grouting can commence after 3 days.
In addition to the above guidelines, large slim tiles require some diligence and thoughtful decisions from the contractor. It is not recommended to hurry, but rather to concentrate and carefully proceed with the application – this helps to avoid costly mistakes in measurements and installation. Last but not the least, all the actions related to large slim tiles fixing should be carried out by at least two persons which significantly facilitates the installation.
|
|
WE RECOMMEND ATLAS Epoxy Grout
|
Overview
Room
It must be large enough so that a large slim tile fits in and the contractors can maneuver it. Otherwise, any other larger room must be adapted for preparation works.
Tools
Tools needed for work: manual cutter with a guide and suction cups or clamps or electric disc cutter, abrasive discs, diamond hole saw, frame with suction cups or set for transporting large size tiles.
Substrate
It must be perfectly even, non-deformable and geometrically stable. Otherwise, different thickness of the adhesive layer can result in the tile cracking.
Adhesive
In case of large slim tiles one must use the adhesive of at least C2 S1 class. Long application time requires long open time. It is recommended to carry a test before actual tiling on a given surface.
Grout
The width of the joint should be greater than 5 mm. One needs to remember that large size tiles are grouted later than small tiles – it is due to the difference in moisture evaporation time beneath large surface.
Original text: Radosław Kaflowski, ATLAS Group
English text: Piotr Marciniak, Michał Gosławski, ATLAS Group