News
Plasterboards fixing
Drywall is an alternative to the traditional plasters used indoors. Plasterboards can be fixed to the wall with an adhesive or screwed to the steel or wooden frame.
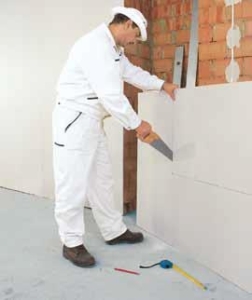
If we decide on the drywall, we need to choose from various types of boards. Some boards are recommended for use in dry rooms, others in wet rooms. There are boards for bending at dry state and boards that have the ability to diffuse the sound. Finally, we can purchase boards combined with thermal insulation layer or others which form the thermal insulator themselves. Plasterboards are easy to use. They can be easily cut, sawed, drilled, nailed and screwed. Their longitudinal edges are covered with cardboard. Plasterboards edges can be finished in the following manner: uncut (to make the joints visible), bevelled (to make the joints visible), flattened (to facilitate filling the joints with the reinforcing tape). In order to cut the composite boards we need a handsaw or an electric saw. Curvilinear cuts are made in the boards with a jigsaw; the holes for the slots are drilled with a circle-hole saw.
The preliminary works.
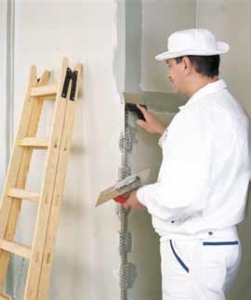
The technology of fixing the plasterboards to the internal walls does not lead to many difficulties. However, the contractors should have some experience in this matter. We must keep in mind that plasterboards have little deformability. Thus, the improper installation results in unaesthetic cracks and uneven surface. Above all, the work should be carried out by two persons at least, as this way it is easier to handle large boards. All the works should be anteceded with the check of the substrate. This concerns the adhesive mortar adhesion to the substrate, but also the evenness and vertical or horizontal deviations of the substrate. The assessment should be performed with the use of at least 2-metre-long level. If the deviations are smaller than 1.5 cm then the plasterboards may be directly fixed to the substrate. Substrate deviations of 1.5 cm and more enforce additional wall leveling. In case of large wall unevenness, it is allowed to fix the strips of boards first, and next to install the whole boards onto previously mounted strips. Spacing between these substrate-adjusting strips should be approx. 40 cm.
Afterwards, the wall surface should be carefully vacuumed. If it is too dry then it should be additionally slightly moistened. It is advisable to prime the wall made of cellular concrete with an agent decreasing the water absorption. Such action will extend the time for possible adjustment of the board after the installation. For this purpose, ATLAS offers a wide range of primers, e.g.: ATLAS UNI-GRUNT (AVAL KT 17), ATLAS GRUNTO-PLAST (AVAL KT 16). One should also remember that any steel elements which are in contact with the gypsum adhesive should be protected against corrosion. Prior to the actual boards installation one should cut them up to the required length. A cut board should be 1.5 cm shorter than the height of the room. It is obligatory to leave a gap of 1 cm at the bottom, and of 0.5 cm at the top. In order to keep the bottom gap even at any point, it is convenient to place the board on the 12.5 mm thick board pieces.
The adhesive application.
Plasterboards are attached to the wall with the use of appropriate gypsum mixes. The perfect material for this purpose is ATLASGIPS BONDER gypsum adhesive. It is used to bond the plasterboard to the surface of cement, cement-lime and gypsum plasters, walls made of clay or sand-lime bricks, of aerated concrete as well as gypsum elements. The adhesive is applied onto the board with a point method in the form of the patches. The spacing between them should be of 30-40 cm both vertically and horizontally. The applied adhesive patches should have a diameter of about 10 cm and thickness of approx. 2.0 cm. It is crucial to prepare as much adhesive as can be used within 30 minutes. Note that one should bond the boards and adjust their arrangement on a wall not later than 10-15 minutes after the application of the adhesive onto them.
What is essential is to keep the ratio of adhesive and water according to the manufacturer’s recommendation. One must follow the rule to pour the dry mix into water and not the other way around. The mixing process should be short and performed with a low speed mixer. Excessive mixing shortens the adhesive setting time. There must not be any adhesive residues from the previous mixes left in the vessel, as they accelerate the binding of the fresh compound.
Boards jointing and filling the joints.
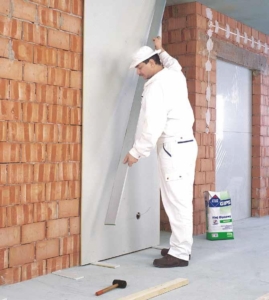
 Having applied the adhesive, one should raise the board vertically and set it on the wedges. They facilitate the board moving and enable to adjust the side edges to keep the vertical position. The plasterboard should be gently pressed against the wall and then hammered with a rubber hammer through a wooden batten, so that the board leans against the direction points. Then, in the same way we press the board toward the upper direction points. When hammering, the strokes may not be strong –these should be rather gentle taps of the wooden batten. The consecutive boards shall be fixed in the same way and then checked with a long level to determine whether the boards form an even plane. At lintels – the places where the boards do not lean against the floor – we fix the board during installation with rawlplugs. Therefore, we prevent the plasterboard from sliding and avoid setting the supports.
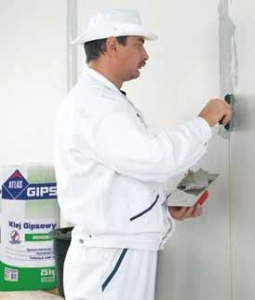
Filling the joints between the plasterboards should be carried out in two stages using a fibreglass or a paper tape. One presses the reinforcing tape into the first coat of the filling mortar and then level it. Once the mortar hardens, one applies the second coat, smooth it, and grind it when it dries. In the corners, we put the aluminum corner profiles and apply the coat of the filling mortar. Before the final finishing with a paint or a wallpaper, the plasterboards surface must be primed in order to even the absorption at areas of joints and over the plasterboard surface. This action enables uniform application of the paint and easy removal of the old wallpaper without damaging the surface when wallpapering anew.
TYPES OF PLASTERBOARDS
The plasterboards available on the market can be divided into the following groups:
Standard – A, for general purpose; of thickness from 9.5 or 12.5 mm. The plasterboards of this type can be used in rooms with relative air humidity not higher than 70%. They are covered with the grey cardboard with blue inscription. One can obtain bends of minimum radius of 60 cm with the use of the standard plasterboards. They are designed to cover walls and ceilings in the form of dry walls. Their advantages in comparison to the conventional plasters are as follows:
• there is no moisture resulting from plastering – no need to wait until plaster bonds and dries,
• small amount of dust and debris during work – one obtains a smooth surface.
Impregnated – H2,consist ofthe gypsum core protected against water with the silicone emulsions and covered with the impregnated green cardboard. They can be used in rooms with relative air humidity not higher than 85%, provided that the entire surface is covered with the damp proof material and the room is ventilated. The standard board thickness is 12.5 mm.
Fire-retardant – F – products of improved fire resistance parameters, with the addition of fibreglass covered with the grey cardboard with red inscription. They can be used as the fire-resistant cladding for load-bearing building elements (in rooms of relative air humidity permanently lower than 70%). It is also used for the attics encasing. The standard thickness of the boards is 12.5 mm.
Impregnated fire-retardant – materials of increased resistance to fire; covered with the green paper with red inscription. They combine the parameters of F and H2 plasterboard types. The gypsum core contains the damp proofing additives and fibreglass. This type of plasterboards can be used to cover load-bearing building elements in rooms of periodically increased relative air humidity. They are used inter alia for finishing the bathrooms located at attics. The harmonized European standard EN 520:2004 lists the requirements for plasterboards, furthermore it distinguishes three additional plasterboards types: type E – used as the stiffening of the external walls constructed in the framework technology, type R – of increased resistance to damaging longitudinal and transverse loads, type I – of increased surface hardness.
There are also available:
Base plasterboards used beneath the plaster – used mostly on the load-bearing structure. They have rounded edges. Due to the absorbency of the cardboard used they form perfect substrate for the gypsum plaster.
Composite plasterboards – manufactured from insulating materials such as hard polystyrene foam or polyurethane. In general, they are used for indoor insulation. The insulating layer has a thickness of 20-60 mm. Plasterboard may also be combined with the boards made of mineral fibres.
Thermal insulation boards – are combined with the insulating material – usually polystyrene or mineral wool. Such plasterboards are intended to insulate walls and ceilings indoors.
Boards which can be bent at dry state – when using them one can obtain a concave arc of inner radius of minimum 60 cm or an outer arc of up to 110 cm. Curved boards are fastened to a metal frame with incised horizontal profiles and formed into an arc of appropriate radius.
Original text: Tomasz Wojtynek, ATLAS Group
English text: Piotr Marciniak, ATLAS Group