


News
Renovation of a terrace in context of the thermal insulation
Thermal insulation of walls – too easy! Construction of a terrace – a little harder… Joint between the terrace construction and the thermal insulation… Hmm… A hard part is coming.
The joint between terrace and thermal insulation is a point where two different layer arrangements of different purposes and operation characteristics meet. However, it is not the biggest problem. Frequently, both systems are installed by different contractors and, in addition, in different time periods – and these are the two factors which are the biggest threat for proper joining the terrace and the thermal insulation.
Many professionals already had the opportunity to see the water washing over the compartment walls in client’s house. The leakage was located at the joint with a terrace slab. Generally, the reason for this defect could be a human factor – lack of communication between the contractors executing particular stages of construction work, lack of knowledge when it comes to the appropriate order of installation, or simply poor quality of work.
What comes first?
A subject which causes intense discussion, especially among the tilers, is an answer to the following question – where to start the work if it consists of the renovation of a terrace/balcony and/or the thermal insulation of wall adjacent to the terrace/balcony? Should we insulate the wall adjoining the terrace or install the tiling on the terrace surface first? The contractors are not unanimous here. The problem often resolves by itself, especially in newly constructed buildings. In this case, the tiler begins his part of work when the thermal insulation is already installed. What happens then? What the tiler can do, if there is already render on the façade? Apply a plinth on it?
Many contractors do this, as it is a convenient solution for them. But is it correct in terms of technology? Absolutely NOT. Indeed, fixing the tiles after thermal insulation works is convenient for a tiler. If the installation order is reversed, he needs to come to the construction site again after some time and install the plinth when the insulation works are finished. It is also safer for balcony or terrace tiles, which are not secured properly against potential damages done by the thermal insulation installers.
Unfortunately, convenience and speed of work do not go hand in hand with technological correctness, i.e. application of tight solution. Water which washes over the wall is going to penetrate beneath the under tile waterproofing, even if the waterproofing and a sealing tape are applied beneath the plinth.
4 basic steps
Responsible contractor is aware of this risk and tells investor about it. Consequently, a responsible investor or supervising inspector takes some action to prevent potential failures.
Step 1 – execution of under tile waterproofing and application of tiles on the terrace surface and at the area of joint with wall.
Step 2 – fixing the thermal insulation on the façade.
Step 3 – fixing the plinth made of tiles.
Step 4 – applying the base coat and thin-coat render.
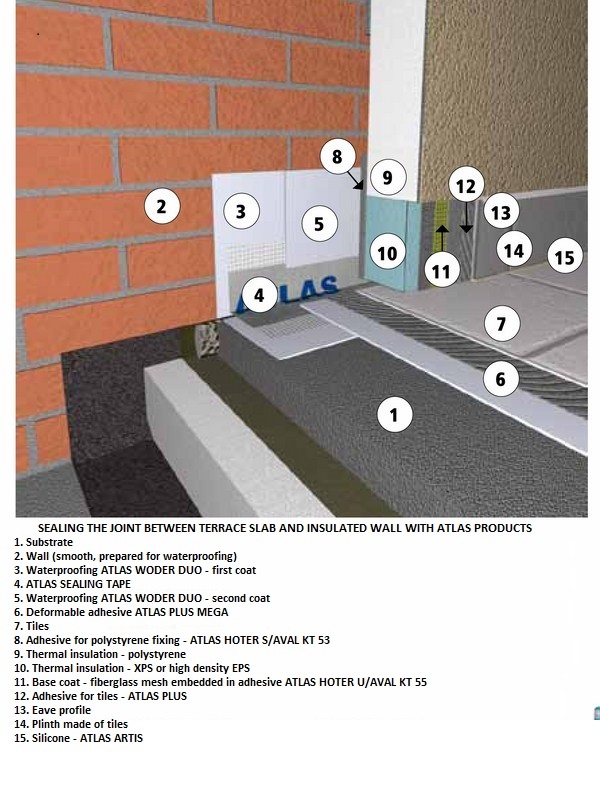
Naturally, these are just the basic steps, and the devil is in the detail. One of the most important details is the connection of render with the plinth surface. The render coat is approx. 2-3 mm thick, whereas a tile with an adhesive is approx. 1 cm thick. If we use polystyrene of equal thickness, the plinth will protrude beyond the wall surface. It is not a correct solution and we must do something else. The thin-coat render cannot be applied with a thicker layer, however, we can still move the plinth backwards and introduce it into the polystyrene layer.
The simplest solution is to fix a 3 cm thicker polystyrene board up to the level of the plinth upper edge. This way we do not form thermal bridging and gain the possibility of hiding the plinth under the eave. The eave can be shaped by using appropriate façade profile – eave profile, or (if we do not have this type of profile) by cutting at a slight angle the polystyrene board over the plinth (shape it in a way to get an eave). As a result, water running down the wall does not penetrate beneath the plinth and is removed from the terrace in the direction according to the surface slope.
3 real cases
We can distinguish three situations which a contractor may come across at the construction site:
- Neither thermal insulation nor tiling is installed;
- The tiles are fixed, but there is no thermal insulation;
- Thermal insulation is installed, but there are no tiles.
Let’s examine each case and determine the work order, assuming that the works which have to be executed are: application of under tile waterproofing and installation of tiles:
- a) No thermal insulation on walls and no tiles on the terrace surface:
Work order:
- Prime the substrate and the wall.
- Float the wall surface.
- Install the sealing tape along the edge between the wall and the terrace – embed it in the layer of under tile waterproofing which should be applied on the wall up to 30 cm above the terrace surface.
- Apply the under tile waterproofing on the rest of horizontal surface.
- Fix the tiles using the adhesive of C2 class and S1 deflection parameter.
- Fix the thermal insulation to the wall (preferably XPS or high density EPS), thickness: 2-3 cm at the thinner plinth section.
- Apply the base coat.
- Apply render above the plinth.
- Fix the plinth of tiles which should be hidden under wider polystyrene board.
- b) Thermal insulation and render installed, there are no tiles on the terrace surface:
Work order:
- Remove all the thermal insulation layers and render up to the height of the plinth tile – the most difficult part of work (it must be cut out evenly and without any chips).
- Float the wall surface.
- Install the sealing tape along the edge between the wall and the terrace – embed it in the layer of under tile waterproofing which should be applied on the wall up to 30 cm above the terrace surface.
- Apply the under tile waterproofing on the rest of horizontal surface.
- Fix the tiles using the adhesive of C2 class and S1 deflection parameter.
- Fix the thermal insulation to the wall (preferably XPS or high density EPS), thickness: 2-3 cm at the thinner plinth section.
- Fix the plinth of tiles which should be hidden under wider polystyrene board.
- c) Tiles on the terrace surface, but no thermal insulation:
Work order:
- Fix the thermal insulation to the wall (preferably XPS or high density EPS), thickness: 2-3 cm at the thinner plinth section.
- Apply the base coat.
- Apply the render above the plinth.
- Fix the plinth of tiles which should be hidden under wider polystyrene board.
Each of the above operations may produce additional questions, for example: should one fix the tiles on the terrace surface as far as the wall surface (so they are fixed also under polystyrene), or should they reach only the plinth (polystyrene is then based directly on the terrace slab). In view of the technological correctness and tightness, fixing the tiles as far as the wall surface seems a better solution. However, if a client decides to remove the tiles and fix new ones, it would be easier to do it when they are not hidden under the polystyrene.
To those who expect the full tightness, we also recommend fixing additional sealing tape along the edge of the screed and the base coat of the thermal insulation system.
Original text: Piotr Idzikowski, ATLAS Group
English text: Piotr Marciniak, Michał Gosławski, ATLAS Grou