News
Thermal insulation of buildings – defect under investigation
Even though thermal insulation seems like a simple technology, it produces dozens of errors. They are made by architects who prepare incorrect construction details designs or choose improper render in view of terms of use, or by investors who insist on quick work progress and who do not maintain the façade properly. However, the following article is dedicated to installation errors. We start with fixing insulation boards and application of base coats.
Case 1. No peripheral strip of adhesive.
Defect
After a few days since the insulation boards fixing, the crew began to apply the base coat layer. That was the time when defect occurred – the boards began to come off.
Diagnosis
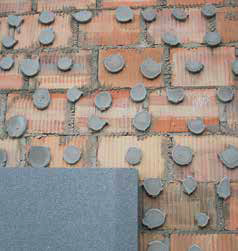
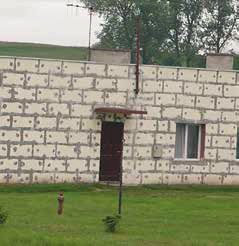
It turned out that while the adhesive bonded firmly to the substrate, there was not enough bonding between the boards and the adhesive. The investor made a complaint about the adhesive. A manufacturer’s representative came to the construction site and found that boards were applied with a point method only (which is already an error) and that the size of surface to be coated with the adhesive is smaller than required (Photo 1).
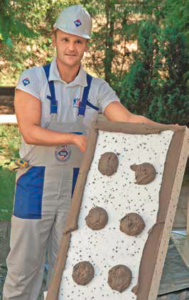
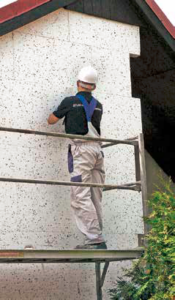
The contractor explained that he had always applied adhesive this way and he had never had any problems. In addition, this time he applied his “low-cost” method to fix graphite boards with which he had never worked before. The graphite boards, despite their better thermal resistance properties, have lower bonding to the adhesive than the white EPS boards. Therefore, prior to fixing, they need to be grinded and de-dusted. This action improves chances for final success. Nevertheless, both in case of white and grey (graphite) boards, the adhesive should be applied upon the backside of the board with the strip-point technique (Photo 2). It involves forming a continuous peripheral strip (minimum 3 cm wide) at the edge of the board and even distribution of 6 to 8 patches of adhesive (8 – 12 cm in diameter) over the entire board surface. The contractor unconsciously committed one more mistake – he fixed the boards to façade exposed to sun rays. He did not know that graphite EPS boards, in contrast to the white EPS boards, are more heavily heated by sunlight. When their temperature drops in the evening, their dimensions change a little bit. This results in violation of adhesive binding (further information one may find in the “Remember” section).
Solution
It was decided to fix graphite EPS boards with a strip-point method (according to the manufacturer’s recommendation) and check the effect after three days. The contractor tried to detach the “test board” himself. It turned out that the board bonded to the adhesive very well and that the adhesive strongly bonded to the substrate.
After this result, the investor ordered the contractor to remove all the boards and residues of adhesive and to fix the insulation again in accordance with the manufacturer’s instructions – with a peripheral strip. Fortunately for the contractor, most of the detached boards were not damaged and could be used again.
|
Remember Read the Technical Data Sheet carefully. One can find the following note in ATLAS Stopter K-20 Technical Data Sheet: Do not apply warm graphite – enhanced polystyrene. Protect graphite – enhanced polystyrene from warming up during installation and initial adhesive binding, as it may result in adhesive loosening.
|
Case 2. Fixing the boards – too thick adhesive layer
Defect
After several months since the insulation system installation, there occurred cracking on the outer insulation layer. There were also humps visible. They indicated that for some reason the boards detached from the wall.
Diagnosis
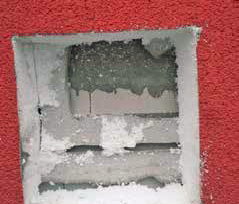
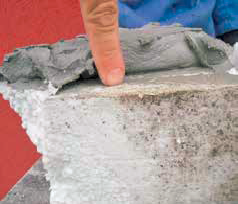
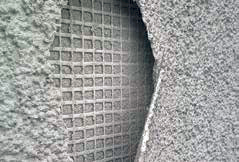
The suspicion fell on the adhesive used for the boards fixing. The manufacturer’s representative proposed to do an opencast which consists in cutting out a cube with all layers of the thermal insulation system – from adhesive up to thin-coat render (Photo 3). The opencast revealed that the adhesive thickness exceeded 3 cm. This means that it was three times greater than indicated in Technical Data Sheet (Photo 4).
The normal course of work shall consist of two stages: wall leveling and fixing the boards. Failure to abide one of these rules – wall leveling – was a mistake and in result it led to cracking. The contractor did not want to spend time on waiting until the leveling coat dried, so he used 2 in 1 method – he applied so much adhesive on the board that it was enough to fill the entire space between the wall and the backside board surface. The problem is that too thick adhesive layer gives much bigger contraction. This in turn gives a significant change in the size of adhesive bonding area, which in result leads to the destruction of the adhesive bonding to boards and substrate.
Solution
For several months the insulation system did not fall off the wall mostly because of the base coat layer and sufficiently strong connection to the wall in areas where the adhesive was applied properly. Later, the nature and laws of physics laid bare the execution errors. Investor’s quick reaction upon noticing the defect could potentially save someone’s life. It is easy to imagine that a detached part of insulation could fall off and seriously hurt somebody. As a result of the error discovery, it was ordered to remove the defective insulation and to perform the insulation works from the very beginning.
Case 3. Fixing the boards – gaps between the boards
Defect
Contractor fixed polystyrene boards in a very sloppy way and probably made all the possible mistakes during the work. Here, we also find already aforementioned errors: too thick adhesive layer and lack of peripheral strip.
Diagnosis
Contractor’s extreme negligence was revealed at a time when he began to fill the free spaces between the boards. He did it in a quick, easy and pleasant way – with the use of adhesive (Photo 5). We are not surprised with it as proper filing of these gaps would probably take twice as much time as the boards fixing. The right response to this situation should be cutting out polystyrene strips of the same dimensions as the gaps and pressing them
between the boards (Photo 6).
Solution
The only thing that could be done was removing everything and starting the work all over again with a new contractor. And probably it applies to this case. Otherwise, if we leave such “grouted” boards, we may face at least two negative situations. The first is the occurence of thermal bridging. They locally chill the wall and in result cause growth of mould on the inner surfaces.
Lack of continuity of insulation is also a major drawback in the efficiency of the entire thermal insulation system and leads to much higher costs of heating a building. The second issue is the appearance of the façade render – we may observe that the gaps wrongly filled with the adhesive are clearly visible.
Case 4. Base coat – too thin adhesive layer
Defect
The investor stated that cracks appeared on a façade render first. After a few weeks render began to detach (Photo 7).
Diagnosis
Thermal insulation system manufacturer’s representative was summoned to the construction site. He tore off a piece of render, which was not difficult. Inspection showed that beneath the detached layer one can see the reinforcing mesh. Such situation can be caused by at least two reasons:
1. The contractor applies too thin base coat.
2. The contractor applies the base coat in two steps. Firstly, embed the reinforcing mesh into a thin layer of adhesive (e.g. ATLAS Stopter K-20 2 in 1 adhesive) and then level the surface with another adhesive coating (when the first layer dries).
In this case the first of above situations applies. The evidence is lack of adhesive on the detached piece. To be precise, there was some adhesive, but it was so little that it could be hardly called a coating. Perhaps the contractor just dragged the trowel with adhesive over the wall so he could hide his error. But it was not long until the truth came out. If the second option was a case, then the adhesive would delaminate and there would be a layer of adhesive (e.g. 2 mm thick) stuck to the render piece.
Solution
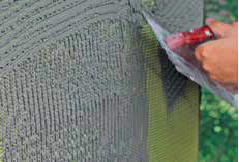
Problem was solved comprehensively at the expense of contractor: all non-bonded parts of render were removed, new base coat was applied over the entire wall (adhesive was applied over the polystyrene surface and spread with a notched trowel (Photo 8)), finally new render was applied.
Case 5. Base coat – lack of diagonal reinforcement
Defect
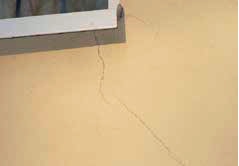
There appeared diagonal cracks on the façade. They originate in the area of window corner (Photo 9).
Diagnosis
The diagnosis was clear even without an opencast. When the failure resulting from the structural crack was excluded, the implementation of diagonal reinforcement in the area of windows and doors reveal was called into question. Finally, the contractor admitted that he did not apply it.
Solution
The repair consisted in applying new base coat with diagonal reinforcement and applying new render over the whole wall (at the expense of contractor).
Reinforcement is designed to strengthen the façade at areas where scratches and cracks can appear. They are the result of tensions accumulation. Diagonal reinforcement (Photo 10) consists in installation of mesh strip perpendicular to the area of potential cracks in the base coat. They must be applied before the main mesh strips are attached.
Original text: Piotr Idzikowski, ATLAS Group
English text: Piotr Marciniak, ATLAS Group