


News
Ceramic flooring fixing – difficult cases
Flooring made of terracotta, milled rock or stone tiles, in comparison to other types of floors, are more durable, more resistant to loads, easier to keep clean and, last but not least, they offer wide scope of decorative possibilities. However, sometimes the application of ceramic cladding may cause difficulties. In this text we are going to investigate some troublesome cases.
Correct installation of ceramic flooring is not that complicated. However, it requires some manual and organizational skills of a contractor, as well as one’s proper technical knowledge. Application of ceramic flooring cannot be considered as tiling and grouting works only. Appropriate preparation of the substrate can become a decisive factor in most of the ceramic flooring applications. Floors are arrangements consisting of several layers. When one plans installation of the ceramic flooring, they should take into account not only the outer layer (onto which the tiles are applied) but also all the intermediate layers. Every time a contractor needs to evaluate the actual condition of the floor. This task becomes easier if the same professional applies all the floor layers and knows what to do. On the other hand, it gets harder when one has to assess layers laid earlier by a different professional who is no longer at the construction site. In these situations, it is often necessary to perform an outcrop in order to assess the condition of the intermediate layers comprehensively. One should not have any doubts regarding the condition of the substrate for ceramic flooring. Therefore, we would like to present several challenging application examples with ceramic flooring top finish.
To make the text more clear we decided to skip the analysis of the requirements relating strictly to tiling. Instead we will focus on substrates and floor layers which are not particularly visible when it already comes to tiling.
|
Types of substrates Immediate substrate under the tiles fixed with cement adhesives is usually of mineral structure: concrete, repair and leveling cement mortars, cement or anhydrite screeds or mineral under-tile waterproofing materials. However, it is also possible to apply ceramic flooring on different types of substrates, e.g. timber or steel structures. Non-mineral substrates always require an individual approach with detailed specialist analysis. Still, it does not mean that the application of mineral screeds can be carried out in an uncontrolled way.
DIVISION OF MINERAL SCREEDS DEPENDING ON THE STRUCTURE TYPE: |
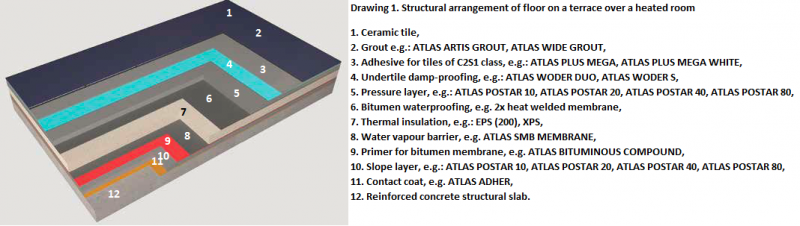
Case 1. Ceramic flooring on a terrace above a heated room
Correct structural arrangement of a floor on a terrace above a heated room is shown in Figure 1. Ceramic flooring is laid on the top of arrangement composed of several layers. Each layer fulfills different function in such arrangement. One layer can protect against rain or damage, while another can provide proper thermal insulation or appropriate water drainage direction, etc. Floors can be successfully constructed only if their components are applied correctly (they also need to be applied in the correct order) and they are made of materials which technical parameters meet the particular specification. Before installation of the ceramic flooring one should pay special attention to the following factors:
1. Appropriate substrate slope: 1.5 – 2.0% (Figure 1; layer 10)
The slope is usually made of cement screed bonded to the floor slab with a specific contact coat. Since the slope is formed already within the first layer, it is possible to apply the subsequent layers of the same, even thickness.
This is particularly important as one should aim to avoid stress and deformation in the zone subjected to shock temperature changes, in outer layers of uneven thickness (especially pressure layer) (Figure 1; layer 5).
2. Sealing against water vapour which penetrates from a room space to the floor layers above
Water vapour which penetrates through the floor layers located above the room characterised by high relative air humidity can reach the surface of temperature lower than the dew point. Water vapour can make the thermal insulation layer wet and in result decrease its insulation performance over time. Vapour barrier (Figure 1; layer 8) must be tight (no breaks, holes or apertures). In typical situation it should reach at least 100 m of equivalent air layer thickness* (the more the better). Atlas Bitumen Membrane provides more than 480 m of equivalent diffusion thickness.
3. Proper selection of thermal insulation material parameters (Figure 1; layer 7).
One cannot limit it only to check of the heat transfer coefficient (λ) and calculation concerning appropriate thermal insulation thickness. The resistance to compression is not a parameter of less importance. In case of residential construction industry the resistance should be at least CS(10)200 – which corresponds to polystyrene EPS-200 hardness. In result of appropriate calculations, one can easily verify that EPS-200 polystyrene of 15 cm thickness will compress by 0.6 mm when it is evenly loaded with the distributed force of 8 kN/m2 (800 kG/m2). Generally, the compression greater than 0.6 mm is considered to be too high as the continuity of damp-proofing beneath the tiles must be kept, especially at the joint between floor and walls.
4. Correct arrangement of expansion joint within the pressure screed (Figure 1; layer 5).
We have to take into account that this layer is located in the zone subjected to thermal impact, including the most dangerous thermal shocks. The expansion areas should meet the following conditions:
a) expansion pad area < 5 m2,
b) expansion pad side length < 3m,
c) ratio: the length of the longest side to the shortest side is maximum 2:1
One must not forget that any expansion joints in screed must be transferred onto ceramic flooring. Therefore, it is essential to plan the arrangement of ceramic cladding so that the joints coincide with the expansion joints.
*Equivalent air layer thickness (Sd) is the value which indicates how much resistant is the material to water vapour. It gives the value which is represented by the corresponding thickness of air layer in meters.
(e.g. Sd = 100 m means that the material is resistant to water vapour the same as 100 metres thick air layer).
|
Explanation of exemplary polystyrene specification Polystyrene specification: EPS EN 13163 T2 – L2 – W2 – P4 – CS(10)200 – BS115 – DS(N)2 – DS(70,-)1 – TR100 |
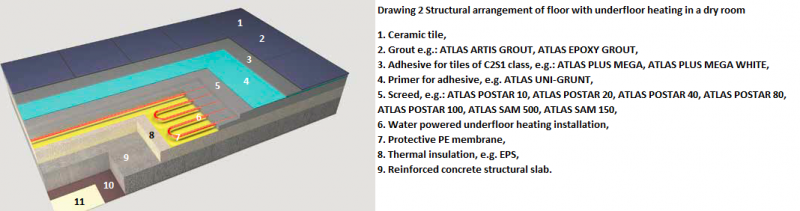
Case 2. Ceramic flooring on a floor with underfloor heating
The simple arrangement of a floor with underfloor heating system in a dry room is shown in Figure 2. Pressure layer (Figure 2; layer 5) which is a substrate for the ceramic tiles has an interesting structure. Like in the first case, it is laid on the thermal insulation layer, however the polystyrene is only about 5 cm thick. Therefore, the deformation of EPS in result of compression is not as important as on the terrace. The factor which makes this type of floor special is the heating system in the form of pipes filled with hot water installed in the screed. The arrangement with underfloor heating can influence and deform the screed in result of water temperature change. Hence, one needs to pay special attention to some important issues during the application.
1. Good heat conduction parameters must be provided to ensure high underfloor heating efficiency
One may obtain it by application of screeds with the free flow characteristic. They encase the heating pipes tightly without any gaps (air encased in a small space is an excellent insulator – this is not a desirable situation here).
One must not forget that can pour the mass after successful pressure test of the heating system and only when the pipes are fully filled with water (empty pipes will flow up to the surface). When using compounds of dense-plastic consistency, it is essential to apply them carefully so that they are distributed near the pipes and appropriately thickened. When it comes to dry rooms, the best choice of the screed would be the compound based on calcium sulphate (anhydrite, they stand as “CA” in the appropriate standard). There is more to come regarding the risks for gypsum scrreds as we will talk about them in the case 4. In wet rooms, due to the poor resistance of gypsum-anhydrite to long-term dampness, one must use only cement screeds (indicated in the standard as “CT”).
2. One should ensure appropriate thickness of the screed
Technical conditions impose the minimum thickness of the floating screed as 40 mm. However, 40 mm thick layer is not enough to cover the heating pipes properly. The condition which must always be met is that there is at least 35 mm of screed above the pipes. It results from the fact that the heating elements can cause screed deformation and formation of scratches above the pipes. In extreme situations, they can cause delamination of the screed (horizontal cut on the entire plane above the tubes) and separate the layer which results in significant decrease of underfloor heating system efficiency.
3. The last but not least, one may begin to fix ceramic tiles on screeds with underfloor heating only when the screed is properly matured and stabilized (relevant information on this subject can be found in the products technical data sheets).
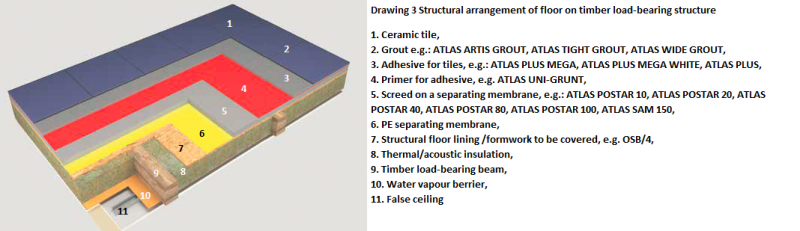
Case 3. Ceramic flooring on a floor with timber structure
Figure 3 shows a typical floor on a timber structure. One should pay special attention to the following issues when fixing ceramic tiles on this type of floor:
1 Generally, floors with timber structure are much lighter than concrete or ceramic floors.
For this reason, they are more subject to all kinds of deformations such as deflection or curling. One should not forget that wood is very vulnerable to changes of moisture. In result of these changes timber elements can change their shape (beams may twist) and warp – these are commonly known phenomena. In addition, due to small mass of timber load bearing structure, it is far more likely to set timber floors to vibration. Both deformation and vibration are easily transferred to the surface above the beams (Figure 3; layer 7). Fixing ceramic tiles directly on timber substrates very often ends up in failure because the tiles detach after some time. It happens despite the fact that the OSB is carefully cleaned and primed. This situation can be significantly improved by using deformable adhesives (S1, S2) with guaranteed C2 bonding (1 MPa). Using small tiles (especially mosaic) is also in favour.
2. In order to provide failure-free operation of ceramic tiles on timber floor, one may apply the cement screed (Figure 3; layer 5) on a separating membrane (Figure 3; layer 6) laid on OSB (Figure 3; layer 7) attached to the timber floor structure. The minimum thickness of such screed is 35 mm. Additional load will definitely increase the weight of the floor (attention: load capacity must be checked with proper static calculations). But on the other hand it will also significantly reduce the vibrations. After the ceramic tiles are fixed on the screed (preferably with the use of self-spreading C2S1 type of adhesives) we get a rigid 5 cm thick structure (structural plate), which is definitely more resistant
to deflection and deformation transferred by the timber load-bearing structure.
|
Recommended humidity of screeds Recommended humidity of screed before the application of ceramic tiles (small and medium): |
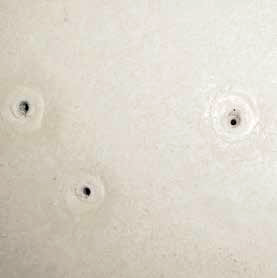
Case 4. Ceramic floor on an anhydrite screed
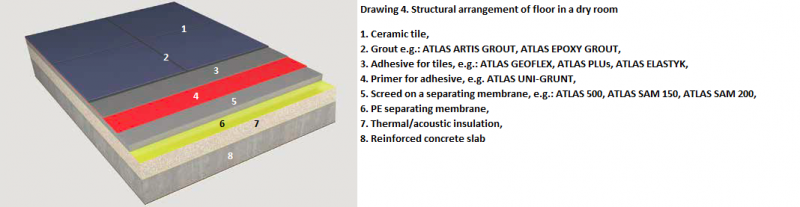
The simple arrangement of floor layers in a dry room is shown in Figure 4. Factor which distinguishes this case from the others is the anhydrite screed – material which has the characteristic of gypsum after setting. We have already mentioned that using anhydrite screeds is not recommended in wet rooms. There are also other issues which require a closer look.
1. Gypsum screeds are always applied in a liquid consistency (levelling screed). They are considered to be more resistant to mixing water overflow than cement compounds and that dosing can be done only at contractor’s convenience. This is an absolutely wrong assumption! The amount of mixing water determines the “hardness” of the set gypsum compound. The less water is added, the harder the gypsum becomes. Likewise, the more water the softer the screed becomes. Relation water to dry mix in directly influences the screed resistance to compression and bending. There is also a risk that too much water can result in stratification of the aggregate and the gypsum binder and lack of the screed surface cohesion, so that it becomes impossible to fix the tiles. Hence, it is absolutely decisive to keep the amount of added water according to manufacturer’s instruction and fix the consistency according to the flow test. The flow test is described in details in applicable technical data sheets.
2. If one applies the screed (especially of gypsum type) which is bonded to the substrate (not shown in any Figure here) one needs toprime the substrate (e.g. with ATLAS Uni-Grunt, Aval KT 17).This is carried out not only to unify the absorption level, but most of all to protect the setting anhydrite screed from potential air escaping from the substrate. If air penetrates through the screed (which is not a desirable process) air tubules with little craters are formed at the end. The craters form inequalities (check the photo below) on the screed surface which make it impossible to apply an even top finish, especially carpet flooring.
3. In order to guarantee proper bonding of adhesives for tiles to gypsum screed surface, one needs to remove the layer of so called “gypsum laitance”. It is recommended to remove it when the compound is already hardened with the use of a steel trowel. If one waits too long the use of specialist abrasive-grinding tools, which is more laborious and produces a lot of dust, might be necessary.
4. When the gypsum screed dries (in average conditions it takes approx. 7 days per each cm of the screed layer), before fixing the tiles, it is obligatory to apply a “separating” primer (e.g. ATLAS Uni-Grunt, Aval KT 17 or ATLAS Uni-Grunt Plus, Aval KN 97) so the direct contact between gypsum and cement is not possible.
If the surface between gypsum and cement materials is even a little damp, it gives favourable conditions for the formation of salt called Ettringite. Ettringite increases in volume during formation and becomes the major cause of the tiles detachment from gypsum substrates. More moisture between cement and gypsum means that more Ettringite will appear.
Original text: Waldemar Bogusz, ATLAS Group
English text: Piotr Marciniak, Michał Gosławski, ATLAS Group